
The easiest way to accomplish this task is with Hot Door’s CAD Tools, as it lets you set the scale of any given document or layer in Adobe Illustrator. Not only that, but it also allows you to draw objects at that scale by using the CAD Tracker tool to change the size of an object in its real word size.
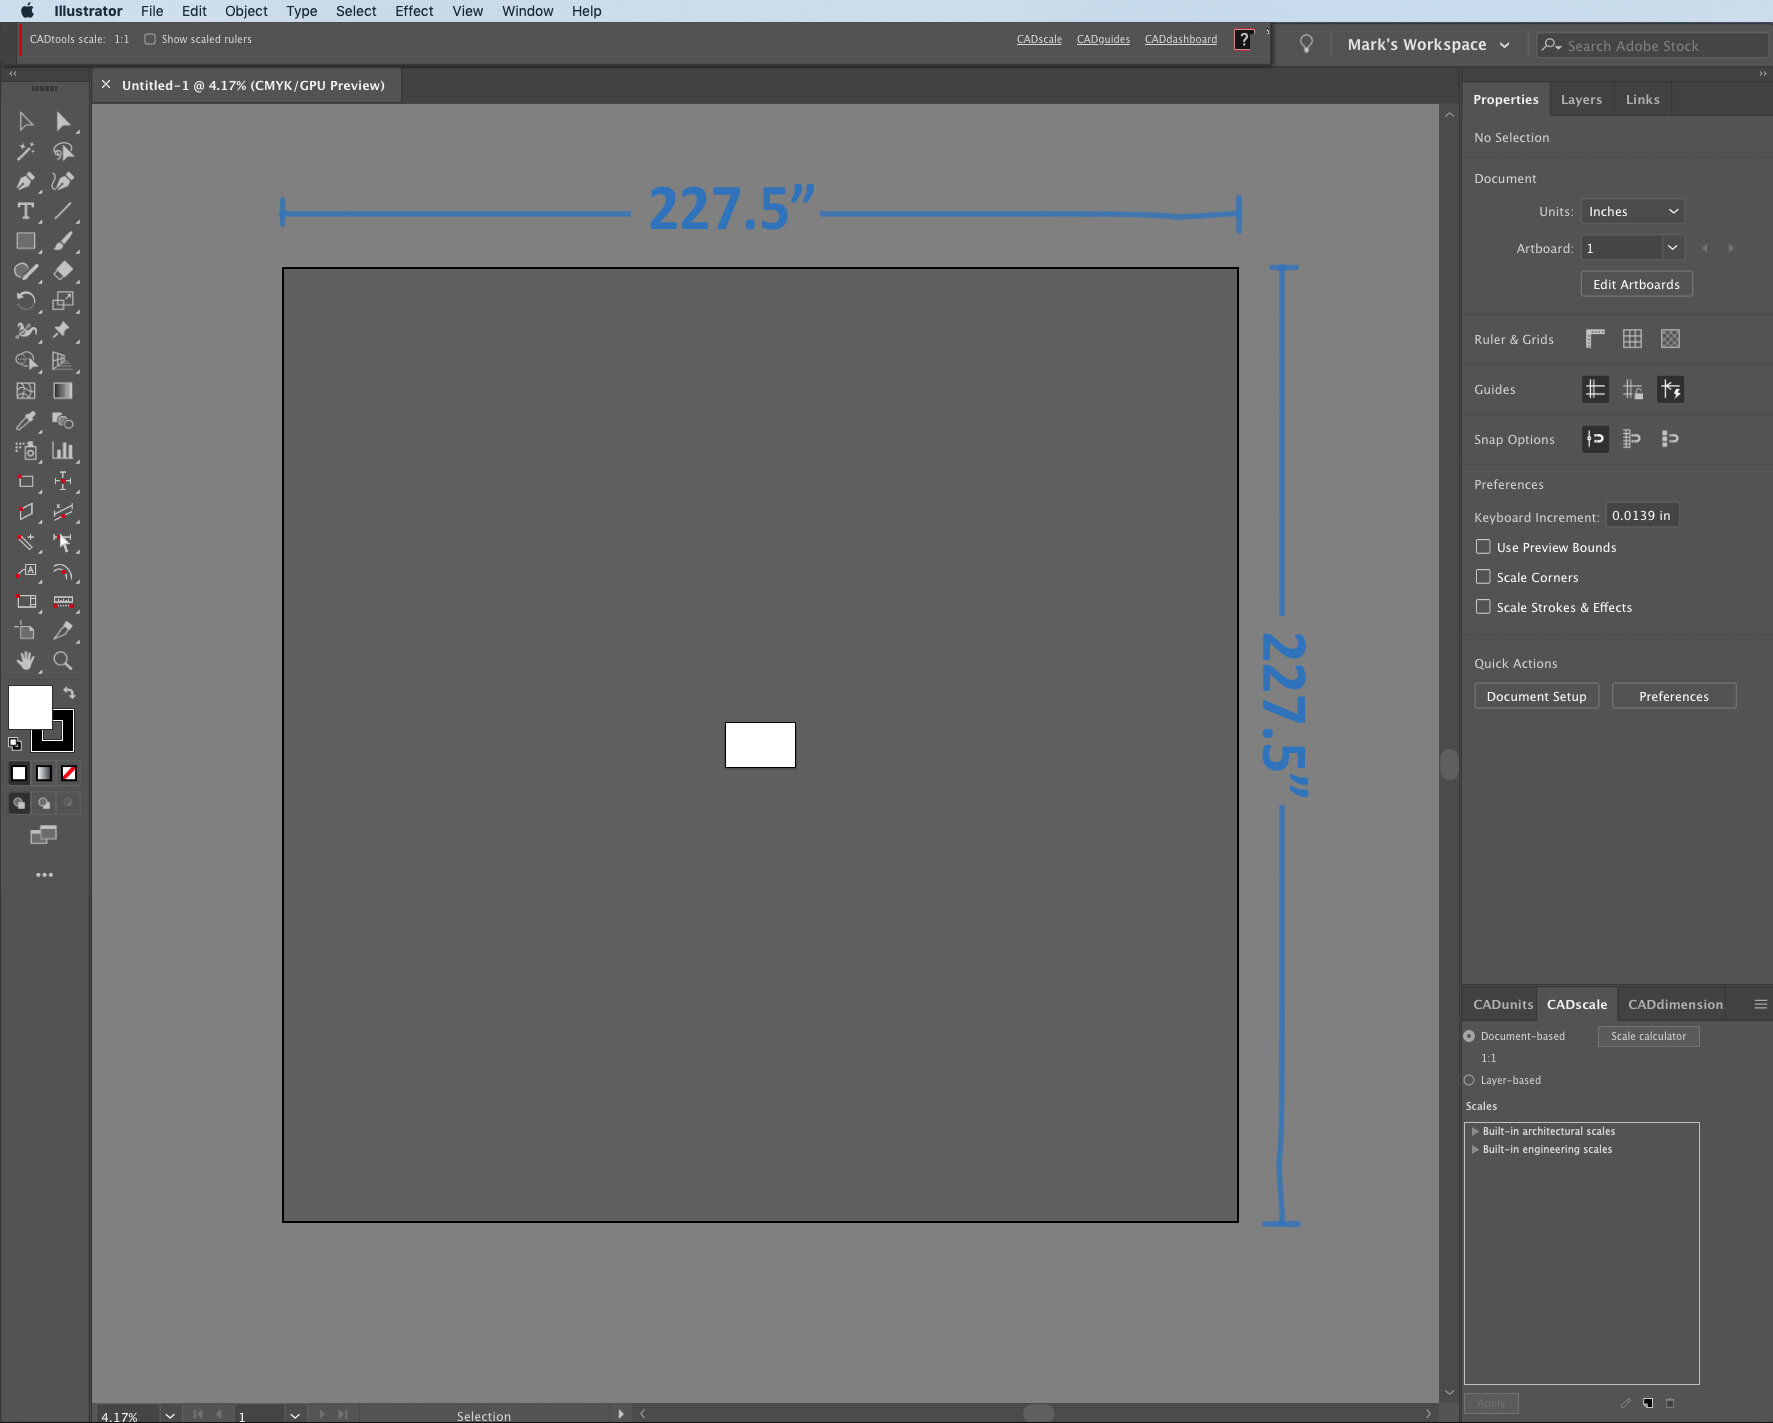
But for those of you who don’t have CAD Tools, I had spent a lot of time figuring this out in the pre-CAD Tools era and even if you have CAD Tools, this is important for every 3D designer to internalize. Since Adobe Illustrator has an artboard limit of a bit less than 20’ x 20’ (227.5” square to be exact), in the world of experiential it is often hard to draw graphics, textures and floor plans at full size in Illustrator.
Before you go down the rabbit hole, don’t worry. I have created a cheat sheet that allows you to quickly scale items up and down in Illustrator. Download the cheat sheet. And keep in mind, all this complication is what makes CAD Tools such an important tool.

Drawing to scale to the rescue
There are several benefits to drawing to scale:
-
You can then use an 11 x 17 sheet of paper with many of your textures drawn to scale on a single page. You can save this page as an Illustrator editable PDF so it is also easy to share with your team/client for approval and feedback
-
You can fit much larger items on a standard page size and still know that when they are scaled up to full size in graphic production or CAD detailing all of it will be in the correct proportion (beware of the scale checkboxes and effects as some items in Illustrator don’t always scale up and down when using the scale tool).
-
You can use Illustrator line art as vector splines and open them in many 3D modeling applications. So, if you have a complicated object or client logo, you can build it in Illustrator and then import it into your modeling software.
-
There are often 3D objects in your model like monitors, product or counters, and if you draw to scale you can rough these items in to your elevations so that you are assured that your texture map will map correctly and avoid all these items in your 3D model.
-
All of the fonts, patterns, and logos in your Illustrator elevations will map to the correct scale and proportion in your 3D model.

There is a little math involved (Or a primer on what scale represents)
But, before we get to drawing to scale, let’s take a moment to discuss how scale drawing works, because you’ll need to do this math to draw to scale in Illustrator without the CAD Tools plug-in. The good news is that it is all simple division and multiplication.
First, let’s discuss the difference between proportion (used by most 3D modeling applications for scaling) and percentage (used by Illustrator for scaling). THEY ARE THE SAME NUMBER, just a different decimal place. Take a look at this chart, proportion is listed on the left and percentage on the right. The only difference is the location of the decimal place.

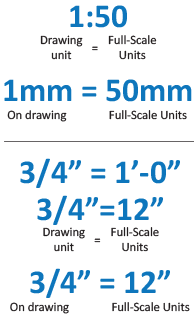
Now let’s talk about percentage and proportion when it comes to a scaled drawing. A full-scale drawing has a ratio of 1:1 where the scale size on the left is the same size as the full size on the right. A very important way to think about these relationships is that the left side number represents the scaled size of the unit listed on the right side. At full size, these numbers match as 1 foot on the drawing represents 1 foot in real life (full size). So, a drawing at 1:50 means that 1 unit on the drawing represents 50 of those units in the real world. This is typically a metric (engineering scale) so 1 mm of drawing = 50 mm. An imperial (architectural) scale can get a little more complicated since the units are mixed. Take ¾” = 1’ – 0”. This means that every ¾” on paper = 1 foot. For math purposes you have to think of this in like terms – ¾” = 12”.
Now – time for some math.
To scale something down from full size to the scaled size:
-
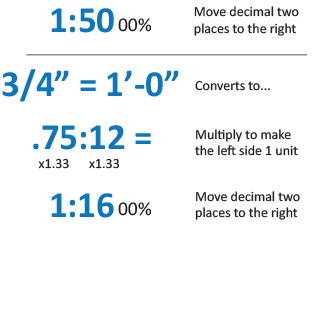
1:50 can be converted to a fraction 1/50 and then divide the fraction to get a decimal point representation of the fraction and you get 0.02. Looking at the chart on the right .02 means 2%. So, this scale is 2% of full size. NOTE: That we move the decimal place two places to the right to get to our percentage and you’ll see that’s the case in the chart above.
-
This works for ALL scales as long as the units on the left and right match. ¾”= 1’-0” is the same as .75” = 12” and then the decimal is .75/12 which equals 0.0625. Move the decimal place two spaces to the right and you get 6.25% of full size.
-
¼”=1’-0” is important because it provides an example of the limitations of Illustrator. ¼”= 1’-0” is the same as .25” = 12” and then the decimal is .25/12 which equals 0.0208333. Move the decimal place two spaces to the right and you get 2.08333% of full size. If you do this math on a calculator, you will see this is a repeating or irrational decimal. In Illustrator this can cause a problem because Illustrator scaling only has three decimal places and our decimal repeats forever. That means when you scale down you are just getting very close and then when you scale back up that error remains.
-
Try a couple yourself: 1:200? 1”=1’-0”? Answers are at the bottom.

Scaling up is even easier, just move the decimal place two places to the right again.
-
If you have something drawn at 1:50, just move the decimal place of the 50 two places to the right and you get 5000%. To scale something that is 2% back up to 100% 100/2=50. You are scaling up 50 times and in Illustrator that proportion must be expressed as a percentage or 5000%.
-
Again, architectural scale gets a little trickier. You have to convert the ¾”= 1’-0” to a numerical representation similar to 1:50 to allow you to move the decimal place over two points. 3/4 or .75=12 doesn’t work because we need the number on the left to be a 1. Three-quarters (.75) goes into one (1) 1.33 times (or 133%). Multiply both sides by 133% (or 1.33) and we get 1:16. So scaling back up from ¾” scale means scaling up 1600% (moving the decimal over two points to the right).
So that I didn’t have to continually do these conversions, I created a scale cheat sheet that I find very handy. Besides providing all the scale up and down percentages for each scale, it also shows the percentage relationships between scales that allow you to move scaled items to a different scale. But we’ll come back to this.
Drawing to Scale
So now, you can decide what scale you want to use in Illustrator (you have to determine how big things will be at your selected scale to make sure they will fit on your page at that scale. If not, you’ll have to scale up or down). I always make a note on the page about the scale the drawing. Now there are two ways to draw things to scale:
-
The full-size trick: If everything you want to draw is smaller than 227” x 227” you can draw them at full size in Illustrator and then use the SCALE DOWN percentage associated with your scale to bring them to the correct scale.
-
The scale-size trick: Draw one item at full-size, scale it down and then duplicate and manipulate to create each scaled item.
-
Create a starter block at full scale (100cm x 100cm, 100” x 100” or 10’ x 10’).
-
Think about what sizes you’ll be altering these items to. Do you need the accuracy of inches? Feet? Centimeters?
-
-
Scale the starter block down using the SCALE DOWN percentage described in the full-size trick.
-
From here, just use the scale tool to change the size (proportions) of the object
-
200% doubles the size from 10 to 20 feet (using the 10’ x 10’ square)
-
50% halves the size from 100” to 50” (using the 100” x 100” square)
-
-
Use the non-uniform scale to make each side a different size
-
Need a 3” x 47” panel? Then scale the 100” x 100” block by 3% and 47% in height and width.
-
-

The magical patterns on the Scale Cheat Sheet
You can download the cheat sheet here. The Architectural and Engineering Scales are in the middle column. The right column shows the scale down percentage. The left side column shows the ratio relationships for the architectural scales, so you know how to scale them back up. For the engineering scales, they are already shown that way in the middle column.
Now take a moment to look at the relationships between the scale ratios.
-
1 ½”=1’-0” is half the size of 3”=1’-0” so their scale ratios 1:4 and 1:8 have the same relationship. So scaling up from 3” scale is 400% and since 1 ½” scale is 50% smaller than 3” scale, the scale up percentage doubles to 800%.
-
This also means that as you go down in scale by the same amount, the scale down percentage also reduces by 50%. From 25% to 12.5%. Engineering scales have this same relationship.
-
Finally, in some very small text are the scale relationships between scales. These are handy if you just pick a scale and start building things and then decide you want to quickly change scales. Since there are some many relationships as the scale get larger and smaller, there are only a handful of different percentage that allow you to move between scales.

In closing
CAD Tools is an invaluable tool because it does all the math for you, but understanding these relationships also allows you to scale items yourself when you need to quickly build an elevation or texture map.
Answers to problems:
1:200 equals 1/200 = 0.05. Move the decimal place two spaces to the right and you get 5% of full size.
1”=1’-0” is the same as 1” = 12” and then the decimal is 1/12 = 0.0833. Move the decimal place two spaces to the right and you get 8.33% of full size.
